Preface:
 Nine years ago I had returned to my land after an absence of 3 decades. One of the first things I did was establish a working water system by moving my old 250 gallon steel water tank and stand about 6' uphill. To that I connected a system of Rubbermaid tubs on a rack adding another 240 gallons. This all fed down to a ground level spigot from which we would fill gallon jugs for use in our antique trailer home. I did all this thinking that it had to be within easy reach of the water delivery truck, and it was, as long as I reminded him to bring his long hose. However, this is when I also learned that he really expected a ground level hookup since the pump on his truck could push the water up to nearly any height.
This was all based on the premise that any other method would be way too expensive. I knew that my neighbors paid through the nose for connecting to the public water system. Also, I had seen those large professionally installed 3000+ gallon steel tanks around, but they had to be expensive so I didn't even bother checking into that. Obviously we were on a rather tight budget, such that when my wife insisted on buying her drinking water at the supermarket, it could lead to some serious discussion.
The following year I installed a PVC pipe system mostly underground from the tank-tub system to a new sink inside the trailer and to 2 outdoor faucets. The low pressure flow was not great but we had 'running' water! Since there was no flushing toilet, no washing machine and no shower a 490 gallon fill-up would last almost an entire visit of 5 or so months. Of course the lack of those luxuries was something of a sticking point. 'We' could endure the chemical (biodegradable) toilet since only one of us had to deal with emptying it. My wife's bi-weekly visits to the laundromat were do-able, but the lack of a hot shower was big; way big. Having to visit the coin-operated showers in town twice a week, as wonderfully refreshing as it was, was still highly unacceptable to at least one of us, and admittedly a nuisance to the other.
Each year's visit generally showed an improvement in living conditions:
- In 2001-2 the uninhabitable wood, canvas & tin trailer had been totally
rejuvenated, one end of it completely rebuilt.
- In 2002-3 the 21 x 7 trailer was raised and set on a permanent rack.
A full deck was installed along one side of it.
- In 2005-6 a much needed 8 x 8
tool shed was added with dormer and urinal (nice!).
- In 2007-8 a
solar panel system was installed on the shed. The shed and trailer were wired and a real fridge replaced the camping cooler.
- In 2008-9 a 2600 gallon tank was placed high on the hill, a tankless water heater was installed and a shower stall was added to the deck.
Buying the water tank:
Still thinking it would be too big a job and too expensive, I ran a search online for "water tanks" anyhow. The big thing now was polyethylene; not steel, the reviews were great, and the price was right. Only a 3 year warranty but I could find nothing about any having deteriorated over time. A 3000 gallon tank generally ranged from $900 to $1026. I submitted requests for info from various dealers. The shipping quotes ranged from $250 to $890.
The most helpful responses and the best prices came from Loomis Tank Centers,
www.loomistank.com. The salesman Mark Brokaw answered my most arcane questions with courtesy and knowledge. His price for a Rotonics Manufacturing Inc (RMI) 3000 gallon tank was $1395.00 plus $250.00 for delivery, plus tax, from their nearest outlet in Hemet, about 70 miles away.
He also suggested I check out a local dealer in Morongo Valley,
The Cactus Mart, aka Morongo Hardware, about 21 miles away. I did so. They did not have a 3000 gallon tank, but they did have a variety of other tanks smaller and larger. Eight days later, on January 12, when the pad was ready I called and purchased a 2600 gallon RMI tank for $1348, including tax and delivery.
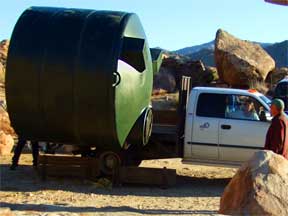
It was delivered the next day by a gentleman named Brian, and his wife. I got out there ready to help him gently lift the tank off of his truck and carefully set it on the ground. He climbed up on truck bed, removed the strap and gave it a shove. I may have come close to a heart attack at that moment as it bounced and rolled to a stop, but that is when I learned, in an instant, how flexible and therefore durable this tank was. I think Brian really enjoyed that moment, in a perverse sort of way. I gave him a $20 tip anyhow and he departed.
Moving the tank uphill:
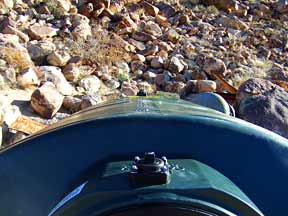
The next morning I began moving it uphill. Three days later it was sitting pretty up on its pad. I am guessing that the pad is about 25' above ground level. The path it took up the hill was about 80'. The dark green polyethylene tank weighs 350 lbs, is 7' 10" high and 8' in diameter plus about 1" for the black polypropylene fitting at the bottom (the top one is set back). The fittings are bolted tight through the tank wall and fully threaded so that pumps, filters and whatever can be attached inside. The top inlet is 1.5" and the bottom outlet 2". The tank includes a 22" vented and threaded horizontal lid on top of a manhole (that we are not supposed to climb through). It was clean inside so to keep it that way I bought 2 black ABS threaded plugs in town to close the holes. It did not come with any because they can pop during transport. I realized later that this was a good idea anyhow to create a vacuum helping the tank maintain its form as it was pulled up the hill. Otherwise it might tend to buckle under the pressure of the stressed straps.
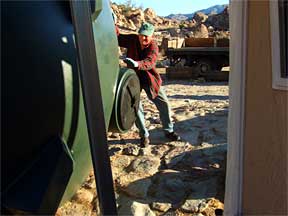
I found that the heat of the sun would expand the air in the tank making it rather solid and therefore easier to move, where in the cool of the night and early morning it would contract and even buckle a bit. In that case the main 2" strap around the body would loosen enough that it could potentially lose its grip and slip off. It did not, but I kept my eye on it. I decided not to compensate for the early morning looseness because when the sun comes over the hill and hits it, it will expand and something might burst. The reason the strap stayed in place is that the tank comes with 3 recessed bands around it and I had tightened the ratcheted strap into the lower recess. I also tied 2 more long straps to opposite sides of the main strap and ran them out past the bottom to the hook on the come-along, thereby pulling the tank uphill bottom first. Were I to do this again I would add another strap or rope around the top just to make sure nothing could slip off. I also made sure the fittings rode on top so that they would not be damaged or get caught on anything.
The other end of the come-along was hooked to a loop in a long heavy 3/4" nylon rope which was securely wrapped around a large boulder above the pad. To give the tank a smooth ride over the rocks and boulders on the hill, I used my extension ladder and various 2x4s to guide it, plus sheets of plywood scrap and heavy cardboard to place between the tank and the rocks as it went along. When the come-along cable reached its end, I would remove it from its loop in the 3/4" rope, pull it out to its full length and tie it to a new loop further up the rope. To hold the tank in place while doing this, I would jam a step ladder or 2 between the tank and convenient boulders. Though a bit risky, it worked. It might have been wiser to bring a 2nd long rope down to hold it in place instead. In fact I did eventually do that near the top of the climb where the tank had to lift almost vertically to reach the edge of the pad.
The pictures in the above animation and in the same shots below (click for a full screen) show how I improvised all this as I went along. It took a total of 13 hours scattered over 3 days to move the tank to the pad. Allowing for coffee breaks, etc., 12 hours is probably more accurate.
|

1/14/09 11:24 AM (8:48 - 11:33 = 2:45) |

4:37 PM (4:37 - 5:47 = 1:10) |

1/15/09 9:46 AM
|

11:13 AM (8:38 - 12:36 = 3:58) |

11:41 AM (5:16 - 6:08 = 0:52) |

1/16/09 5:35 PM (10:22 - 12:32, 5:35 - 6:18 = 2:53)
|

1/17/09 9:33 AM (8:47 - 10:14 = 1:27) |

10:12 AM |

10:13 AM (total hours: 13:05)
|
|

12:06 PM |
|
Laying pipe and getting water:
I spent the next 15 days digging trenches down the hill with a pick, shovel, hammer and chisel (with a wonderful rubber handle & strap I had bought online) around and under boulders and running 1.5" black ABS pipe. The first 10 of those days were devoted to installing the filler pipe from the tank down to a ground level connection. On January 29 Josh Nugent of 'Wonder Water' responded to my email and pulled in with 2000 gallons of water in his truck. That is all the truck would hold so I had to settle for that. At $100 per delivery I could not ask him to bring me another 600 gallons just to see the tank fill up.
Actually it would be a little more than 600 because I wasted some water to flush the filler pipe and the tank. It had occurred to me that the pipe would contain a certain amount of sediment left over from assembling the numerous pieces. Though I temporarily capped the opposite end of each piece as I cut and glued a length of pipe to an elbow, the overall pipe would still accumulate some junk, including the grit from cutting the pipe on my miter saw. I tend to be cautious regarding the microscopic factory chemicals that naturally come attached to new merchandise. For instance, I will always wash new clothing before putting it on. Likewise, I am wary of the chemicals that evaporate from the glue and factory plastic used to assemble the 80' pipe. I wanted that pipe thoroughly flushed out before filling the tank.

 I assembled 2 lengths of pipe a foot or more in length, two 90 degree elbows, a union and a 1 1/2" adapter into something of a C shaped tube. The male adapter was then permanently screwed into the female inlet inside the tank. A 2' length of nylon string tied around each half of the union kept the C shaped section from accidentally dropping into the tank.
When Josh arrived in his truck and clamped his hose to the ground level adapter, I assembled my contraption at the union inside the tank and gave him a thumbs up. As he turned on his pump, the water quickly filled the pipe and blasted out of the reversed C pipe hitting the rocks a dozen or so feet from the tank. A half minute or so of this was more than enough to clean the pipe and I signaled him to cut the power. I removed the C shaped section and hung it over its mate inside to remain there until the next time the tank would need filling.

 He turned his pump back on and a blast of water hit the opposite side of the tank nicely spraying down the interior. I had previously installed a shutoff valve outside of the bottom outlet with a 10' pipe temporarily stretching out into the void. After the water level rose above the outlet, I opened that valve allowing the tank to flush itself for awhile. Of course I could not completely flush it because the outlet is just above the 100 gallon mark, but something is better then nothing. I believe it took another half hour or so for his truck to empty itself. I had also installed a shutoff valve at the bottom of the filler pipe so he was able to disconnect his hose without getting blasted by the contents of the pipe. He had arrived at 9:19, departed at 10:14.
I had not covered the pipe yet so I was able to inspect my connections for leaks. One elbow near the bottom had a very slight leak. It happened because the adjacent pipe had to take a serious twist and turn around a curve which apparently stressed the elbow too much before the glue had dried. No harm done here since this pipe will never need to store water.
 During the fill-up I had noticed a slight leak at the top where the threaded adapter enters the tank. I had mistakenly assumed that the ABS pipe did not need Teflon tape around the threads. This was wrong thinking and I should have checked it out. Again here, no harm done, but that is not the case for the threaded adapter at the bottom.
 It also shows a very slight leak which I am going to need to fix when the tank empties a year or so down the line. This is going to be difficult because it is in a very confined spot. I had run both pipes through a round plastic box about 10" in diameter normally used for buried sprinkler shutoffs. I had done so to protect the shutoff on this pipe and the elbow on the other pipe knowing that it was in a tight location that would have to be stepped on in the future for one to get between the tank and a rock wall that would be going up about a foot out from the tank.
 Somehow I will have to cut the pipe inside that box, unscrew the valve-connector assembly, tape it and put it back, with the cut ends glued inside a new coupler, all this while squeezing myself between the tank and the rock wall. Or rethink the whole thing outside of or without the box. Oh well; I'll deal with that when I get there. When I built the rock wall a few weeks later I did bridge the stones over the pair of pipes, so I will have some flexibility.
 I then went to work on adding the outlet pipe so that we could put all this good water to use. A third of way down the hill the original trench turns south carrying the filler pipe from the tank to the truck hookup. I dug a 2nd trench from the half-way point down to the southeast corner of the utility house (aka: tool shed), pretty much equidistant between the prospective shower to the right and our existing system straight ahead. This time I assembled the pipe in the air above most of the rocks so that no joint could be stressed until it was good and hard. Then with the full hot sun warming the pipe to maximum flexibility, I carefully but firmly guided it down and around the rocks and into the new trench. That worked very well.
I cut a hole in the end of a rectangular valve box and slipped it over the pipe. A shutoff valve was then glued to the pipe and a union to that. The entire setup was nestled down into a rectangular hole chiseled into the bedrock to hold the box. I decided not to test the pipe at this time. I wanted to keep the area dry as I went to work on installing copper tubing from the union forward. That was on February 2.
On February 5, with the union disconnected, I opened the the tank's valve and then the valve in the box at the bottom, allowing the ABS pipe to flush itself. With reconnection of the union, we were in business.
 We now had a strong flow of fresh clean water at the sink. There were no leaks and none developed over the next few weeks as the pipe remained exposed while I worked on the new shower stall.
On February 11 the shower plumbing was completed over a new deck extension.
On February 14 the water heater was installed and we had hot water. It was still too chilly after dark to take a shower in the open air.
On February 21 enough of the shower stall was in to allow us to take our first shower in the sun. Structurally, this was completed on March 6 though later I would spend some time sanding, shaving and adding towel hooks, a shampoo rack and a mirror.
On March 7 I began to fill the trenches, first with all of the loose and broken stone combed out of the accumulated dirt piles and then with the remaining soil. I wanted to return the surface to its natural state with no sign of pipes having been laid except for a box over the shutoff at the bottom end of each. On the steeper sections I cobbled in flat rocks to provide an easy climb to the water tank. In the end, I was able to carry my morning coffee up to the scenic pad without spilling a drop.
|

January 22: Newly cut trench, bottom up |

January 28: Same trench, top down |

March 12: Same stretch, bottom up (not done) |
|
On March 20, began building a stone wall on the south and west sides of the pad to provide shade for the tank. The east side was already shaded by the hillside.
On April 11 we had a stone wall 7' high and 19' long on the inside, up to 11.5' high on the outside, including the pad's retaining wall. It is still not high enough to block all of the sun. In fact in the summer it will block none of the noonday sun, but some shade is better than none, and we are not there in the summer. However RMI claims the "Green opaque tanks blend with the environment, provide additional protection from UV rays, and reduce algae growth.". That "reduce" rather than "eliminate" makes me a little nervous; we shall see how it goes.
|
|
 |
|
|
|